Tuesday, May 20, 2008

May's Tart Kit

The kit this month is filled with several types of fabric that can be used in an inkjet printer. We are assuming you are familiar with your printer and can create an image. If you have a scanner or copier connected to your printer, your options for images increase. Besides the photos you take yourself, try using copyright free images from the web. Scan or copy objects directly to the fabric. Print large images in smaller sections and sew them together. Make landscapes, postcards, collages, doll faces, or create one-of-a kind fabric.


This is a copyright free photo that has been printed onto In Good Company's hand-dyed cotton, quilted, and finished as a postcard. This fabric has not been treated and so will fade over time.

This photo is a sampling of materials available for printing with an inkjet printer. The Bubble Jet Set can be used to pretreat any fabric before printing. This will allow the image to become more permanent and is recommended especially for prints that will be used in garments or in a quilt that will be washed. The Bubble Jet Rinse will help set the image. Fabric is also available that has been pretreated and is ready for printing. It just needs a sheet of freezer paper behind it to allow it to be run through the printer.


Jacquard makes a cotton sheet and an organza sheet for printing. These fabrics can be purchased with the freezer paper already attached. The organza makes a great overlay because it is sheer and translucent. To fuse over another image, use Misty Fuse.


Twill tape and silk ribbon can also be printed on. The trick is to print the words first onto a piece of computer paper. Using double stick tape or Steam-a-Seam 2, press the twill or ribbon over the already printed words. This will create a temporary bond that will allow the paper to be re-run through the printer. You can also iron the twill or ribbon to freezer paper (once you know where the words will print) and run the sheet of freezer paper through the printer.

In addition to the sheets included in the kit, silk for inkjet printing can be purchased. It is already adhered to the freezer paper and ready to print. It gives a wonderful image with a soft hand.

Experiment with the images and the fabric for printing and explore ways to use your prints in a composition.


Tuesday, April 15, 2008

April's Tart Kit

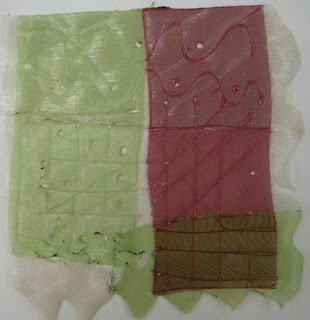
This month, the kit gives us a chance to experiment with a textile tool and melt synthetic fabrics. There are several things that can be done with the tool and the photos below will illustrate them. Be careful with the tool, watch the fumes, and use a piece of glass as your work surface.


First of all, you can carve with the tool. One example is to layer polyester bits onto a piece of wool, cover it with a piece of organza, stitch and melt away the top layer or layers.


Another way to use the tool is to stitch a motif onto a piece of Kunin felt layered with one or more layers of organza and other synthetic fabric. Melt away either the positive or negative space to leave holes as in cutwork.


Use the textile to cut through the layers of synthetic fabric to make appliques that can be bonded or melted to another synthetic background with the tool. Make little pillows filled with confetti, etc.


Without melting through the fabric, "stitch" layers of organza together. Use as a background or as an applique or insert into a larger piece.


Because the edges melt together when you cut through two layers of organza, you can made little bags, or pleats as shown below.


And last but not least, use the textile tool to mark the Kunin felt with geometric lines and shapes.


Thursday, March 13, 2008

March's Tart Kit

The lesson for this month demonstrates two methods of felting: wet felting and needle felting. To wet felt, the roving is layered vertically and horizontally, and then wet with hot water and liquid soap, and then agitated between two pieces of muslin and bubblewrap.


Once it has been pre-felted, it can be fulled more completely with more agitation or with needle felting.


Using different colors of roving and yarn together, many interesting designs can be made.


These last examples show finished needle-felted projects. Notice the shading in the wool fruits.


Thursday, February 21, 2008

February's Tart Kit

This month the lesson is about image transfer using several acrylic products: gel medium, gesso, and acrylic paint. As an extra we added a piece of Bondex as an iron-on method. The basic instructions are to treat the right side of an image and/or background fabric with the acrylic product, place the "glued" image on the fabric background, let dry, and remove the paper backing by moistening and rubbing the back paper away. The "glue" of the acrylic product holds the image onto the fabric.

The back paper comes off in layers and may take several periods of wetting and rubbing before the image is as clear as you want it to be.

The image should be a photocopy, ink jet copy, or magazine or newspaper image: something with a fairly lightweight base paper. Use enough product to evenly coat your image in order to protect it when removing the back paper with water. In using the Bondex, iron the right side of the image to the Bondex and then remove the back paper with water.
The acrylic product you use will affect the backgound of your image. The gel dries somewhat clear, the gesso is white and of course the paint will show through the image.

This is Sue's finished collage of transfered images. She used both the gel medium and the gesso.