Thursday, April 21, 2011

April Tart Kit: Soy Wax Batik


This month's Tart kit gives you the supplies to try soy wax batik, a relatively simple way to make batiked cloth at home. You will be treating PFD fabrics with soda ash, stamping with wax and dyeing to apply color. This process can be simple with one layer of wax and one coloring. Or it can be more more complex with multiple layers of wax and multiple colors. It is up to you!

Before you use your fabric it must be pretreated with the soda ash to allow the dye to color the fabric. The soda ash in the kit can be dissolved in 4 cups warm water. Soak your fabric for 15 minutes and lay or hang to dry. Do not rinse the fabric. The remaining soda ash mixture can then be saved for more fabric if you store it in an air tight jar. In the meantime, prepare a padded stamping surface with several layers of newspaper. When the fabric is dry after the soda ash treatment, lay it flat on your prepared surface. Use the parchment paper to prevent newspaper ink from getting on your fabric.


You have been given about a quarter pound of soy wax and a small aluminum pan in which to melt it. Set your aluminum pan with the wax in a small frying pan with about a 1/2 inch of water and heat carefully. Soy wax melts at about 160 degrees so be careful not to burn it.


You can stamp with many different types of tools. Look around your house for interesting shapes. The soy wax will not damage the tool. It can be washed and used for its original use. It just has to be something that can get hot. We put in a plastic fork if you can find nothing else.


When the soy wax is melted, you can begin stamping. If you are using metal tools, allow them to warm to the temperature of the wax by placing them in the wax for a few minutes. As you stamp, you will want the wax to soak through the fabric rather than sit on the top of the fabric. If the wax isn't soaking in, it isn't warm enough.
This wax layer is "protecting" the color of the fabric which will not color when you add your dye. Use a small paper plate to catch your drips as you move from pan to fabric.


Allow the wax to cool and harden. Meanwhile mix up your dye. The intensity of the color will depend on much powder you use in relation to water. It will not take much to make light color; maybe 1/8 tsp in a 1/2 cup water. Use the latex gloves and a plastic or paper cup and a plastic spoon that can be thrown away later. You do not want to use utensils that will be used for food. If you will be adding multiple layers of wax and color, start light so that each successive color will overdye the one preceding it. If you are going to do one waxing and one color, you could use any intensity you like. The deeper the dye, the more the contrast with the white or light colored fabric base.

Put your waxed fabric into a plastic bag, add the dye mixture, seal the bag and massage the the fabric to completely saturate the fabric. Allow the fabric to batch for at least 4 hours.


When the fabric has batched, carefully pour the liquid dye down the drain and squeeze out the excess liquid from your batiked piece. Allow the fabric to dry flat or hang to dry. Once the fabric is dry, you can stamp again and follow the cycle of stamp, cool, color, and dry. The following photo shows a second layer of wax layed over the first. In this instance the green color will be "protected" in the next dyeing.


When you have finished waxing and dyeing, rinse the fabric under cold water until the water is clear.Take the piece to your ironing board which has been covered with several layers of newsprint, newspaper, or another type of paper that will absorb the wax as you heat it. Removing the wax will take some time and patience. Lay your fabric between two or more sheets of paper and press with a hot dry iron. You will see the wax become absorbed by the paper. You may need to replace the paper if you have a great deal of wax.


The last of the wax can be removed by detergent and boiling water. Fill your sink with very hot water and detergent and agitate the fabric. Rinse by pouring boiling water over the fabric. The soy wax will not harm your plumbing.


Once the wax is fully removed, press again. It may be slightly stiff, but that is the nature of batik. Enjoy using your own uniquely designed fabric.

The dyes in the kit were chosen to be side by side on the color wheel so that you can overdye with both and not get a muddy brown. You may choose to use other dyes or mix the powders themselves to get a third color. Below are examples of two overdyed pieces. The left one started as the avocado and was overdyed with the blue. The right piece was dyed with the blue first and overdyed with the avocado.


Wednesday, March 16, 2011

March Tart Kit: Earth Day Art


This month we have created a Tart kit that will celebrate Earth Day in April. We are going to make fabric from our shopping bags and other plastic. In the kit are several shopping bags, some white and some with color or pattern, as well as plastic mesh, and used thread. Your assignment is to use these items and add other plastic and "throw-aways" to the mix.


Start by opening up the plastic bags so that they are in a single layer. Arrange six layers one on top of each other. Those layers in the middle will not be visible so save the best bags for the outside or one layer down. You might use a layer of white bag to diffuse the bright layer. However, there isn't really one way to do layer the bags.


Cover the plastic with the pressing sheet included in your kit and iron the pile with a dry, hot iron. As the heat penetrates the plastic, it will fuse together. Iron both sides of the pile, always protecting your iron. The hot plastic will not stick to your ironing board cover. Too much heat will cause holes and too little will not fuse the plastic. Experiment.


The plastic will shrink and wrinkle. That's okay.


Add other plastic such as vegetable mesh bags, candy wrappers, celephane, etc or sequins, tissue paper, or other junk. Since the non-plastic items will not fuse, slip them between layers of bags.


Take the fused plastic to your sewing machine and free motion stitch the layers in a large overall pattern. This will hold everything together and add texture to the surface.


Foil can be added with the iron. It will adhere to the plastic without any adhesive. Again, be sure to protect your iron. You can also paint or stamp the plastic. Allow the paint to dry overnight.

When you have created your plastic fabric, use it in your project. It can be stitched together in patches, made into bags or purses, or as the background to a statement piece. Layer other fused plastic as appliques. If there is an Earth Day Art show in your community, consider entering your piece!

Thursday, February 17, 2011

February Tart Kit: Quilt and Paint


Susan's sample is an example of a quilted and painted background. With multiple machine stitched patterns, she has created a very interesting background for her sunflower. This lesson is designed for you to practice the technique on a small piece before attempting it on a larger piece. It is a little scary to spend a lot of time quilting without knowing how the paint will look when it is done. Experiment with this little piece to get confident and then try it on a larger piece or one that could use a little pizazz!

The kit contains two pieces of fabric and a piece of batting. The intention of the lesson is for you to paint the black side, but it is up to you. Maybe you'll want to paint both sides. So layer your fabric and prepare it for free motion quilting or hand quilting.


This project is a great way for you to practice your free motion quilting. There are several sources for designs. The March issue of Quilting Arts has several articles about free motion quilting. Or check out Leah Day's free motion quilting project for 365 filler designs. We suggest that you do your quilting on the colored fabric with black thread as the top thread and in the bobbin rather than on the black side since it is very difficult to see what you are quilting. A thread that matches your fabric will be a subtle detail. Try a contrasting thread to see a different result.


When you have completed your quilting, it is time to paint. We have included Lumiere paint in the kit, but any fabric paint will work well. On your deli wrap or other palette, squeeze out a sizable amount of paint.


Load the foam roller with the paint. Depending on how much you started with, you may need to add more paint to the palette until the roller is filled with paint.


With a light touch, roll the paint roller across your quilted area. You want the paint to stay on the top of the fabric, rather than down into the stitched area. This may take a little experimentation.


As you can see, the paint creates a design element in contrast with the stitched areas. Multiple applications of paint can be added, or additional colors placed strategically. Also the paint can be applied with a paint brush if you want to highlight specific areas.


This lesson is great for changing the look of an old piece that didn't work. It might just need a layer of paint over the quilting. Adding paint over quilting may be perfect for highlighting one area of a large piece. Be daring and try it!

Friday, January 21, 2011

January Tart Kit: Wet Felting: A New Way

This month we are using a product that can make wet-felting much easier and less "work". Artfelt Paper is used as the base of the process and will be washed out when the wool fibers have been shrunk and felted.


You are using the foam and felting needle to baste your fibers to the Artfelt Paper. The actual felting will be done with water and your dryer. Determine the size of your project and cut the Artfelt Paper accordingly. You may have to move it around your foam in order to do the basting.


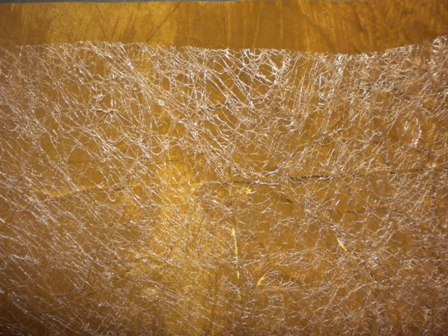
You will needlefelt baste the wool fibers in layers onto the Artfelt Paper, first horizontally and then vertically, gradually building up to the desired density. You may want to draw a design on the paper and "paint" the areas in with specific fibers. While these photos don't show it, be sure to leave a margin of paper around the fibers. 

 Move the paper over the foam to needlefelt the entire area designed. Add yarn, or specific fibers for accent and detail as desired.

Remove the basted fibers and paper from the foam and take it to your sink. With the paper side down, wet the fibers with a spray bottle of cool water until the piece is saturated. The paper will become translucent. Press out excess water before removing from the sink.

On a flat surface, lay the fiber/paper unit on a single layer of a plastic bag. The plastic will keep the fibers from touching and felting into a tube. Lay your piece at one end, making sure the plastic entends beyond the paper and fibers on both sides and the top edge.

Roll the paper/fibers jelly roll style with the plastic bag and secure with rubber bands.

 Throw the banded tube into your dryer for 10 to 15 minutes. It is not necessary to have a hot dryer. You can put it into the dryer with a load of clothes as well.

After 15 minutes, check the felting process. If you want more felting, re-roll the piece and plastic by turning it 90 degrees, secure it and dry it again. The fibers will still be damp and the paper should be crinkled as the wool shrinks, but the paper doesn't. Take the paper/fiber piece back to your sink with the paper side up and pour boiling water over the paper to dissolve it. Finish removing the residue by rinsing with water.

Let the felted wool dry flat. The piece can then be used as the background or applique. You may want to needlefelt other yarns or fibers onto the felted piece.

If you are interested in making a weaving similar to the sample above, simply lay your fibers in a grid keeping areas open. Wet, roll and dry as instructed above.

Tuesday, December 21, 2010

December Tart Kit: Paper Leather


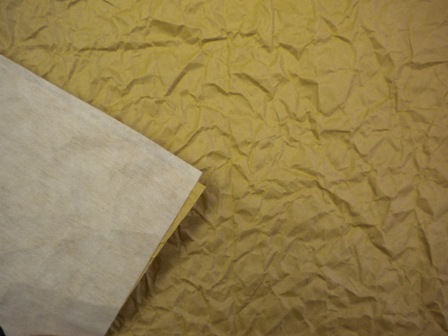
This month we are converting brown paper into leather. With wrinkles, paint, grunge board, and ink, you can simulate the look of leather. Because of the interfacing on the back side, it is sturdy enough to sew. Sue Anne made this small piece by combining paper leather with denim to create a western look.


Crinkle and wrinkle the piece of brown paper in your kit. You want lots of lines and creases.


Smooth out the paper and gently press the wrinkles flat.


Iron the piece of fusible interfacing to what will become the back side of your leather. Be sure the interfacing is well-adhered. Trim the paper and interfacing to match.


Dilute the brown paint with a small amount of water and paint it over the surface of the paper. Allow the paper to dry.


Carefully adhere the Misty Fuse to the front side of the paper, protecting your iron with a teflon sheet.


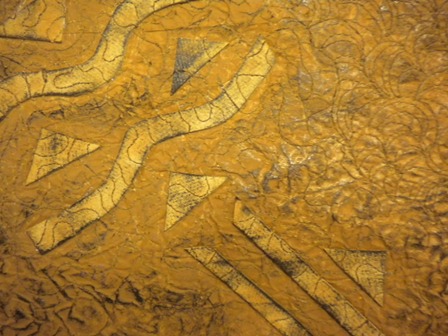
Cut shapes from the grunge board and fuse them to the paper by pressing them onto the Misty Fuse. Again protect your iron. You may have to use steam and iron from the backside as well as from the front. With enough heat, the grunge board will eventually fuse. With your sewing machine and thread, free motion stitch over and around the grunge board. It is easy to sew through, just go slowly. The thread will add more texture to the paper.


Repaint the paper, covering the grunge board and stitching with another layer of brown paint. Be sure you get the edges of the grunge board. You will be painting directly onto the exposed Misty Fuse as well. Let the paper dry completely.


Rub the black ink pad over the surface of the paper. You will decide how much. This will add more dimension and texture to your paper. When the ink has dried, the paper is ready to treat as fabric. It can be used as the background or cut into strips or used as applique. With the fusible interfacing, it will sew without tearing. Do something western!