Wednesday, January 18, 2012

January's Tart Kit: Closing the Gap


This month's Tart kit is all about closures and the lesson is about designing around a single element or elements. Use any or all of the included fasteners and close the gap! Make your quilt relevant to the supplies. Be humorous or literal. Use the fasteners as intended or use them in creative ways. Have fun!
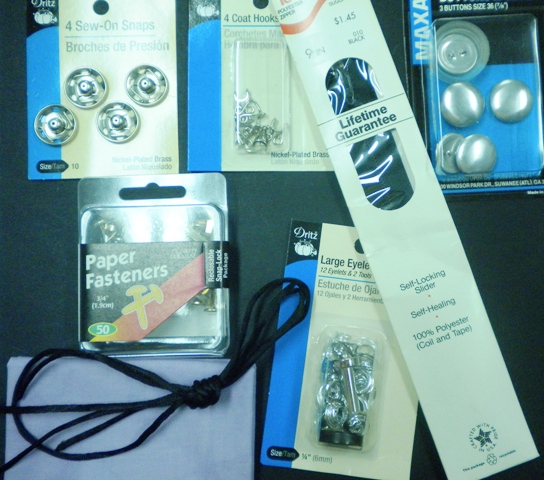


We have included a short demo in making frog closures and a Chinese button. Google frog closures and you will find several tutorials to help you build your frogs. It is easier to build your frog onto a surface that you can stitck pins into. By measuring the distance between loops and placing straight pins in your surface, you can get a balanced frog.


Think of the side that you can see as the back. Baste the loop intersections with matching thread before you remove the pins. One set of loops will be sewn to one of the pieces you are closing. The second set remains free and will connect the gap with a Chinese button or other button.

To make a Chinese button: Create several intersecting loops and weave one end of the cord over and under the loop sides, keeping your work open and loose.


Gradually pull both ends of the cord, allowing the loops to close up.


Cut the cords fairly close to the knot and tack them to the wrong side of the button so that they become invisible. Sew the button at the place where the frog loop will close your gap.
.

Thursday, December 22, 2011

December's Tart Kit: Using deColourant Plus


In this month's Tart kit, we are introducing you to a relatively new product that lets you remove color from fabric safely and replace it with another color. It is called deColourant Plus. It is non-toxic and allows the fabric to keep its soft hand. It is especially great for adding color to dark fabrics without painting. For this lesson we have included a deColourant with a metallic color for you to use on a dark fabric with a snowflake stamp. 

Prepare a padded surface and lay out your ironed fabric. You may want to tape it down. Decide how you will want to apply the deColourant. You can use stamps, stencils or apply the deColourant directly to the fabric. Use the included stamp or alter it by using the shape to make a stencil. Apply the deColourant directly to the stamp with the foam brush. You can vary the results depending on how much deColourant you apply to the stamp.


Stamped


Directly applied


Stenciled

Allow the deColourant to dry thoroughly and iron. It won't matter whether you use a dry iron or steam, though your results may differ. The longer you iron, the more intense the results.


Finally, wash the excess deColourant out of your fabric and it is ready to use as background fabric or cut into strips or patches. You will find this process a very easy way to create one of a kind and unique fabric for your next art quilt.

Thursday, November 17, 2011

November's Tart Kit: Dyeing with Cords


This month we are dyeing with cords to color fabric. The cords have been impregnated with dye which when mixed with a solution of salt and warm water and boiled will transform your white pfd cotton into a vibrant piece of cloth. Be sure to protect your work space, clothing and hands from the dye. You may want to wear a mask as well. There are six colors of cording in your kit. You can use the colors randomly or be specific about blending the colors. Check your colors by cutting an end and placing it on a wet paper towel. You may want to tear your fabric into smaller pieces so that you can try different variations of cord placement.

Lay your cords on your fabric in any configuration you choose. You may use scotch tape to anchor the cords. We have placed them in an "X", in lines, and as snippets.


Carefully, keeping the cords in place, either fold, roll, or scrunch the fabric.
 
Fold the outside edges to the center, repeat until you have a small bundle. Secure with rubber bands.

As you roll the fabric, tuck the length of cord into the roll.

Once rolled, twist and secure with rubber bands.

  
Enclose the snippets inside your "envelope" of fabric.

And then scrunch into a ball. Secure with rubber bands.

In a container that will not be used for food, mix a solution of salt and hot water. Immerse your bundle into the water until it is completely saturated. Dye will migrate into the water so do one bundle at a time. When it is saturated, squeeze and massage the bundle to transfer the color through all the layers.

Insert the bundle into a ziplock bag and "burp" it. Drop the ziplock bag into a pot of boiling water and boil for 20 minutes.


After 20 minutes, remove the bag carefully from the hot water and let it cool in the sink. Remove the fabric from the bag and remove the cords. Rinse thoroughly. If your fabric will be washed in the future, you will want to use soap and water to remove the excess dye.


X's


Lines


Snippets


You have also received a small piece of handdyed cotton that you can over dye.
As long as there is color in the cords, you can dye with them. You can also use your colored salt/water solution to dye, although it will leave the fabric a pale color. Experiment with your cord placements and color combinations and see what interesting designs you can make.  

Wednesday, October 19, 2011

October Tart Kit: Variations on Handmade Paper


This month we are using Kleenex tissue with a solution of glue and water to create backgrounds and molded embellishments. This technique allows you to experiment with mixed media by combining this lesson with fabric as part of a larger art piece.

Prepare a work surface so that you can work with glue and not worry about your project sticking. We used the shiny side of freezer paper. Using the recipe in the kit directions, mix up a solution of glue and water. We'll start with the directions for making a sheet of paper. Separate the Kleenex tissue into 10 to 12 plies and set aside.

Lay one ply on the freezer paper and paint with the glue solution.


Continue adding plies of Kleenex and painting with glue until you have one or two plies left. If you want to insert items for color and interest, you will do it close to the top surface. In your kit, you have rose petals, a cocktail napkin, and tissue paper. Split the napkin into its top ply before using. The tissue paper can be made into confetti or torn or cut into shapes before using. Consider adding threads, fibers, newspaper, or other papers.

The top layer of Kleenex will add an opaque finish.


Once the sheet has dried, it can be peeled off the freezer paper and used as the background or as part of a larger piece. It can be painted, stitched, or printed. Be sure to tape the leading edge of the handmade paper to another sheet of computer paper before running it through your printer.


To make a mold, use the foam sheets included in your kit. You can mold over the design or into the design depending on your choice.


Paint the mold with the glue solution before putting your first layer of tissue on the foam.


Cover each ply with the glue solution, making sure each layer is well saturated and the air bubbles have been removed. Use the brush to push the Kleenex into and around the mold.


You will notice when the glue dries, the top layers have the most texture and the layers next to the mold are more smooth. It is your choice which side to use.


Your paper can be left white if you desire. We have included watercolor pencils for you to use to color your paper. For this pear, the color was applied dry and a brush was used to blend the colors. You may also want to experiment with acrylic paints or markers. Try coloring the glue before painting the Kleenex.


As with any paper, it can be moistened and torn to give a deckled edge. Your finished paper can be sewn or glued to a background. Use a long stitch length to avoid perforating the paper.