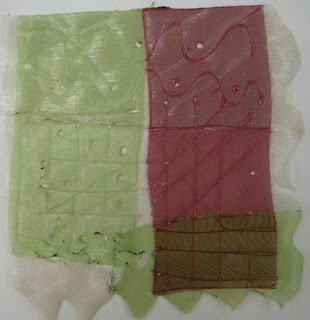
This month's kit contains a piece of Lutradur and several products that you can use to alter it. Sue made this little quilt by coloring the Lutradur with watercolor pencils, melting it, cutting it out and sewing it to her background piece.


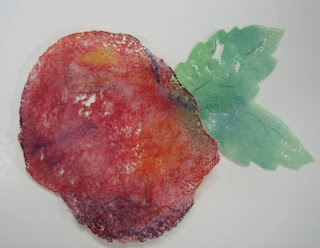
This piece of Lutradur has been "washed" with the watercolor pencils and melted with a heat gun. Melting it gives a lacy effect.

After using watercolor pencils, a gold PaintStik was applied by rubbing it over a rub plate. It was then melted. 
The Lutradur was dyed with a Procion dye. See how the dye concentrates along the spun fibers.

Sue made a sample of different paints on the Lutradur. The bottom was first covered with gesso - one and two coats. You can see the subtle differences. Make your own sample to keep as a resource.

Foil can be applied using a fusible web. While Lutradur has a matte finish, the foil adds glitz! Melt it afterwards for an interesting texture. Lutradur can be printed on. The photo on the left is a copy on paper. The photo on the right is the same image on the Lutradur. Be sure to use a back paper in the printer as the ink will permeate the Lutradur.
 Jamie layed the printed image of Lutradur onto a background, batting and backing and stitched with threads and yarns. Where the Lutradur showed, it was melted out, leaving the background cotton showing through. It was then incorporated into a finished piece.

 Our lesson this month comes to us courtesy of Peggy Holt. Her use of sheer fabric over silk flowers and colorful threads was featured in a past issue of Quilting Arts magazine. We have designed our kit to make use of her techniques. The above quilt was made by Peggy.

 Quilt around the silk flowers and add decorative stitching. As you quilt the piece, the extra organza will pleat and fold. By stitching around the silk flowers, they will become more visible under the organza.

 This month the lesson involves bleach pens and discharging the color from a piece of black fabric. The fabric in the kit is a Kona cotton and will bleach to a rust color. Other fabrics that you try may have different results. Experiment with both commercial solids and prints and hand-dyed cottons.
 Before you begin, it is essential that your supplies are out and ready. Once you have put the bleach on the fabric, the only way to control the discharge process is to stop it by putting it into water. We have included some Anti-chlor for you to use in your second rinse, which should help to keep the bleach from destroying the fabric in the future. Be careful with the bleach as it will dry out your hands, bleach anything it touches, and interfere with your breathing if you inhale the fumes. The bleach pen makes the chlorox easier to handle than straight bleach and has less odor. To prepare your rinse water, fill two containers with warm water: one water only and one with the Anti-chlor (about 1 tsp to 2 gallons). When you finish discharging, you will drop the fabric into the straight water to stop the bleaching process and then rinse well in the Anti-chlor water; then wash well with soap and water. Dry and press and use as one-of-a- kind fabric.
 Use the bleach pen to make designs. This bleach pen has both a narrow tip and a wide one. Work fast as the first mark will bleach more than the last! A foam brush dipped in the bleach gel or staight bleach will also leave designs.
 Squeeze out a small amount of the bleach pen onto a palette and dip a stamp into it and then onto the fabric.


 This month we are using foamy shaving cream to create a base for a marbled monoprint. The shaving cream will hold the thin paint while the untreated fabric is laid on top to print. Once the shaving cream has dried, the fabric is heat-set and washed. You have just made your own one-of-a-kind print!
 Spread the shaving cream in a thick layer onto a covered surface. Smooth it out with a knife or straightedge.


 When you are satisfied with your pattern, carefully lay a piece of untreated fabric on top of the paint.
  This is the back side of the fabric as it is laying on top of the paint. When you are satisfied with the saturation of the paint, it will be time to lift the fabric off.
 As the shaving cream and paint dry, the print will become more clear. Once it is dry, heat-set the fabric between two press cloths. Then rinse the shaving cream out of the fabric.
 Small objects may be placed on top of the painted shaving cream before printing. The shaving cream is firm enough to hold these objects.


 In addition to the sheets included in the kit, silk for inkjet printing can be purchased. It is already adhered to the freezer paper and ready to print. It gives a wonderful image with a soft hand.